Tuesday, December 15, 2020

The Guardian (updated!)

Dear Readers,

I just finished a quilt that I named "The Guardians" as a baby quilt for my nephew's soon to be born baby girl.  I made it using the pattern Lloyd and Lola by Elizabeth Hartman.  You can click here to check out that or other patterns by Elizabeth Hartman.  

My nephew and his wife hiked Machu Picchu a couple of years ago, so when I saw the pattern, I thought this would be perfect for their little one.  I sent a picture of the pattern to my daughter and she thought they would like it too.  

The pattern had rather daunting cutting chart so I spent a Saturday cutting out the pieces for the llama and the background.  I had already cut the pom poms and the small squares used to snowball the corners of those pom poms.   

First I made the pom pom rows, and the blankets.
then I made the llama bodies, being careful to do the mirror images right...I was saving the faces for last as 
there were lots of little pieces and I wanted to do it in a morning time when I was fresh.

Finally I made the faces!!  They came out good, just had one part that had to spend time with Jack the Ripper.  So I had a flimsy.  

I put it on the long arm and quilted all but the white areas and the eyes and the blankets.  I wanted to make the background look like a mountain range and the brown parts look like fur.  I always like a pattern that is organic in nature.  

The white thread kept breaking so I put it on my sit down machine and did the blankets and the white areas.  


Sew on and if I don't get on again before Christmas...Merry Christmas.

Terry

The mother to be with the quilt - 


Monday, November 30, 2020

Mask making

 Hey all,

I made a couple hundred masks when the pandemic was at its highest this summer and I have had a couple of people ask me recently how I did it.  So I decided to write a post about it.  

The basic pattern I use is the one developed by Orange Dot Quilts with a few modifications.  You can click here to read her instructions and download the template.  

I did make a few modification to her pattern.  I line the mask with a piece of light or medium weight sew- in interfacing rather than the batting that Dora Cary suggests using.  And I cut the interfacing to be 8.5 x 10 inches.  That way it lines the whole mask.  I think this gives you more stability and keeps the mask from collapsing into your mouth when breathing.  So after I make the tube I insert the interfacing and top stitch the top and bottom just as Dora suggests.It gets the interfacing locked in place right from the start.  

I then sew a piece of single or double folded bias tape, about 4.5 inches long to the center top.  This will hold a wire or piece of aluminum to form a nose clip to help keep the mask from fogging.  I used garden ties for my wires. 

Then I follow Dora's instruction on trimming and folding the masks. Here are photos of how I fold the mask.


 Once I get them folded right I stitch the folds in place. This is where we differ a bit.

 I measure how long the ends are and cut a piece of extra-wide double fold bias tape that is about an inch longer than the end of the mask.  I fold the ends over to give it some strength and stitch the ends down.  Then I sew this to each end of the mask.  

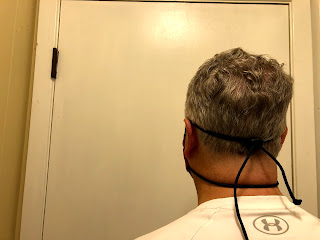
I did not like the feel of the elastic around my ears, maybe it is because I wear glasses, but it bugged me.  So I was watching a movie where a nurse was tying on her surgical mask, so I did a couple that you ran cording through and then tied it around your neck and on your head.  I like the feel but thought what a pain to try to tie those all the time.  So I figured out how to use a paracord and a cord lock so you could get them on and off easily.  I would measure the paracord to about 40 inches.  Then I would put tape at that point and cut the cord.  I would thread it through the bias end and put the cord lock on.  I made a big needle out of a pipe cleaner and painters tape so I could thread it fast.  


I would tie some knots to keep it from being accidentally pulled off and then sear the ends so it would not ravel.    You could easily follow her directions and put elastic in if you like the ear ones better.  

Convinced my brother to be my mask model.  


So a big thank you to Jeff!!  I also did a video of him putting one on so you could see how to wear them since several have asked me.

Here is a link to my you-tube video of him putting on his mask.


Sew on,

Terry

Friday, November 27, 2020

O Tannenbaum

 Dear Readers,

Last year when I was at Celeste's house she said that she doesn't put up a tree as her apartment is small and there is no space.  As I was looking for a pattern that I had bought to make a baby quilt out of, I found this paper-pieced pattern that I bought a while ago call Tall Trim The Tree by Cindi Edgerton.  I decided I needed to make this for her place so she would have a Christmas tree in her home.  It was a bit different from other paper pieced patterns as it was printed on tissue paper, like what old school patterns were printed on.  That made it a bit challenging as it does not add any stability for when you are piecing.  

It finished at 28 x 78 so it is tall like a Christmas Tree!  I sewed snowflake shaped buttons in silver and White on the tree, both to decorate it and as a place you could hang other ornaments!

I quilted this on my sit down long arm as I wanted to write around the edge and I didn't think I would be able to write sideways or upside down.  I wrote part of the scripture from the Christmas story in gold in the outer border,  Merry Christmas on the bottom.  I quilted what I hoped would look like falling snow flakes in the white, grey areas and I quilted the tree with a variegated green in what I hope looked like texture of a tree.  

Put it in a mailing tube and sent it out to Colorado.  I hope it brings you joy, Celeste!


Merry Christmas.

Sew on,

Terry

Wednesday, November 25, 2020

A Baby Quilt - Blooms


 Dear Readers,

This fall I got an invitation for a baby quilt for a teacher at my school that I had taught with for some time,  so I decided to make up a quilt I had been thinking of and had actually cut out, but not made.  

I used the disappearing nine patch block.  I did not use a charm pack but some scraps from a set of fat quarters of Kaffe-Fassett fabric that I had purchased and made a heart quilt out of last winter.  Here is a tutorial on how to do a disappearing nine patch put out by Missouri Star.  

I named this quilt "Blooms". It was amost 60 inches square.  My only regret is I wish I had scaled the quilting down a bit as parts of it seem too big.  I was able to use up some older fabric on the back.  Some that would probably not made it into many tops!  About a 2 yard win!


It is Thanksgiving week.  I have been trying to catch up on a number of things this week.  So thankful for the time off of work.  I really needed the reset.  I pray each of you and your families take time to thank God for all the blessing we have in this day and age.  I know we have all had a tough year, but if you start looking at our blessings, we are really, really blessed.


Here if a picture of the sweet one using her quilt.


Sew on,

Terry

Tuesday, November 24, 2020

A Quilt of Valor - Bravo-Zulu

 Hey Readers,

This year Possum Town Quilters, decided to have Judy Stokes teach a block of the month quilt.  Well with covid, most of it ended up being presented by email.  So she was going to present 13 blocks so you could have an extra since this was being targeted to new quilters, if one came out badly, you would have an extra.  Last fall at the MQA gathering Anne Kelly issued a challenge to make a block, a quilt top, or quilt a quilt for Quilts of Valor. I decided these two challenges could become one.  

I decided to make some extra blocks to make the quilt a nice size for a veteran.  Originally my plan was to give the quilt to Anne Kelley, the Quilts of Valor coordinator for Mississippi so she could give it to the next Navy veteran on the list.  As I was getting close to finishing it I started thinking there is bound to be a Navy Veteran in the Winona area, that I live in, that I could give the quilt to.  Then all of a sudden I remembered my sister-in-law Anne Turnage's uncle was a navy veteran.  He is in his late 90's and was a Naval Academy graduate, as was my dad.  I called Anne and she thought it was a great idea, so she called her cousins and got CDR Wilton Sanders, USN (ret) service dates to go to the QoV coordinator.  

As I was close to finishing the blocks I needed to decide on a sashing.  I really wanted a gold so it would be navy blue and gold, but it did not look as good as I hoped.  So I sent some photos to my good friend Lauren as she has impeccable taste, and she suggested the red with navy cornerstones.  


So red, white and blue it was.  Next I needed to decide on a back.  I had been doing this whole quilt from my stash, and I was going to do the back, pieced if necessary, from my stash too.  I decided to do a split black to look like the sun setting on the horizon of the sea.  Red on top and navy on the bottom.  There is an old sailor's adage that says red at night sailors delight.  I put a strip of white, with just an edge of the sun between them. I did a different quilting design on each block.  I did some ruler work, still not great at that, but getting better, and some free motion work.  


Jeff and Anne Turnage, my brother and sister-in-law, took me over to CDR Sander's home to present the quilt to him.  He was so tickled and pleased with the gift.  
CDR Sanders, Anne Turnage and Terry Turnage

Anne and CDR Sanders

CDR Sanders, Anne and Jeff Turnage


We were even featured in the local paper the Winona Times!

Sew on,

Terry

Sunday, November 22, 2020

A few more eye spy quilts

 Hey all,

Long time no post.  When the quarantine shut down started I has on my computer sooo much during the day, that I did not want to look at it at night.  I still kept sewing and made three eye spy quilts for some special people.  

The first was for young guy that loves airplanes.  I used a topographical map fabric for the background and an old world map fabric on the back.  I piece the name with the letters by From Blank Pages and of course it is the same 5 inch diameter hexagon by Come Quilt With Me.  I didn't have enough airplanes for the whole quilt, so I put other types of transportation and called it The Travelor.  


The second was for his brother who likes science and math!  A guy after my heart. The background on this is circuit boards and the back is math fabric.  I quilted this with sine waves.  Called this one STEMulating Pursuits.


The third one was made for a dear friends grandson.  This was named Observations and was also heavy into science and math.  I used a navy for the back and a cool striped fabric for the binding.


Those are not the only quilts I have done this year, but I will try to update more later.  

Sew on...

Terry

Sunday, February 9, 2020

Convictions

Dear Readers,

Early in the fall I was on a trip to Colorado to visit Celeste.  Well my plane arrived and I took a bus to Boulder where she worked, we had lunch, then while she was finishing her day I took the car and ran out to Golden to the Rocky Mountain Quilt Museum.  These were in the main room.


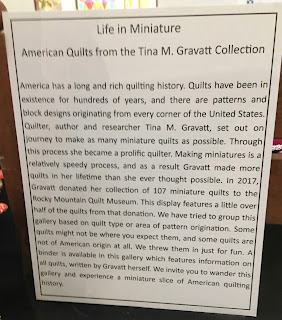
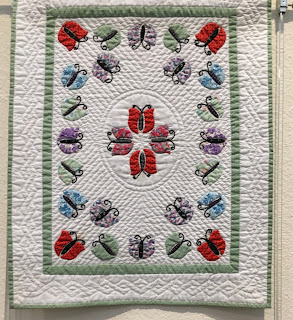
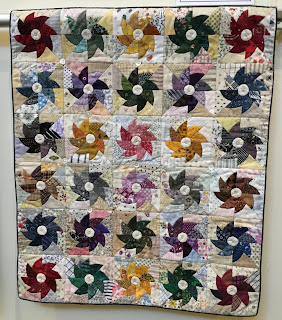
Then in a smaller gallery, there were these amazing miniature quilts.


 This was also out in the main gallery.

I knew I was going to make a quilt for Olivia, a dear friend's Granddaughter, and after the quilt museum I bounced over to Golden Quilt Company and saw a bundle of fat quarters in Kaffe Fassett fabrics.  I picked them up, but had no plan on what to do with them.   If you want to read more about Kaffe click here.

At the Fall Gathering of Mississippi Quilt Association, Carol Punday made a presentation about some heart blocks that she had made.  There was another presentation by Diane Bohn on some paper pieced patterns. She has her own business called From Blank Pages, click here to visit her web page.  I was particularly drawn to her letters.   So I combined those ideas into this quilt.

First I made hearts and the letters....


So using the free pattern on the Cluck, Cluck Sew website, that Carol shared,  in the 9 inch size I pulled one of each Kaffe fabric and made a heart.  I will include a link to that pattern here.  I used the bonus triangles that I got from making the hearts to make the border.  I had to make a couple extra to have enough to go all the way around.  This is the first quilt that I tried to do a custom quilting job on it.  The first few I have done an edge to edge design.  I did some ruler work and some filling in free motion.  I had trouble with the ruler slipping and need to work on controlling the head better, but I had fun and it came out ok.  It is not perfect, by any means, but it was fun.

Sew on!

Terry