Pages

Thursday, October 25, 2018

A high school quilt

Dear Readers,

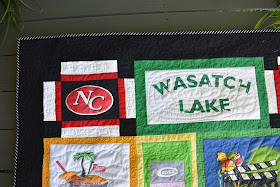
Another quilt I finished about the time school ended was a t-shirt quilt for a client.  I made it using bright clear colors to go around each t-shirt.  The client's favorite colors are brown, gold, green and black.  So I tried to use them as much as I could.


I enjoyed doing the free motion quilting on this quilt.  Here are some close-ups of some of the. blocks.


I had a day off of school, needed a checkup and mammogram and there was a text book meeting in Jackson at 3, so it was a kill two birds with one stone kind of day.  My Highlander had gotten where when it rains water would collect in the driver's side floor mat...so after the check up I ran by the Toyota place and had them check it out.  It was a clogged drain from the sun roof!  So if you are having that issue you might check that and save the $60.  All in all though it was a productive day.

Just about to sandwich the third quilt for this client.  Still have more to post from this Spring or summer, so hopefully I can keep the posts coming.

Sew on.

Terry

Sunday, October 21, 2018

Motive Quilt

Dear Readers,

Last Spring a lady from Colorado asked me to make 4 T-shirt quilts for her.  One of them was using her company work shirts.  She did not want just a typical T-shirt quilt, she wanted one that was more of a custom job.  The issue was that the shirts ran from extra small to extra large and it was a challenge to find a design that would accommodate the difference in sizes and give it the pizzaz that she wanted.  


Since they were company shirts I got a picture of a wall in the company headquarters that had a lot of the company slogan and sayings.  I used those in the border, with some of the logos of companies that they work with.  I also tried my best to come up with quilting designs that would enhance each shirt.

I decided on a kind of snowball pattern that I could adjust to the difference in each size shirt. The client wanted a snakeskin print for the inner part of the snowball and I did a different quilting design on each snowball.  I thought I had taken a picture of each block, but I am not seeing them on the roll.  
Here are the ones I have.


I will do another post in a few days... Let me get caught up with my school work...ugh, it never ends...but I love my job.  It just seems overwhelming at times.  

Sew on,

Terry

Sunday, October 14, 2018

Semper Fidelis

Hey readers,

I just have had a hard time, getting myself back to the blogging.  I was working on some quilts for a customer, and didn't want to post about them, then got behind, and could not motivate myself to get back to it.

My plan is to write about the last quilt I did and then add in some of the other projects and quilts as time allows.


 About a month ago, a dear friend, that I have known since about 1975, was diagnosed with Signet Ring Cancer.  Carlos Brown is my best friend's brother-in-law.  He served in the Marine Corp.  He got out after just a short tour and after he got his college degree he served in the Army.   So as a quilter I wanted to make him a quilt.  Will, my son was visiting shortly after we heard, I told him I wanted to use this jelly roll that I had, whose name escapes me at the moment, but when it comes to me I will put it in.  Will found the pattern "Standing Strong" by Shabby Fabrics.   Their pattern comes out to be 58x73.  I added one more row so this comes out to be 60 by 83.   Click here to check out the pattern. We downloaded it and it happened to be sew a jelly roll day and I had just bought a foam core board to use with the Henry the Blue Heron (another post for another day).  So I would use the foam core board to keep the rows in order so I would not have too many of the same fabrics next to each other.  I made the pattern one extra length as Carlos is a pretty tall guy.   I could have sworn I took a photo of that but I can't find it.

Anyway, after I got the top together, I needed to work on the back.   I had some Gamecock fabric left from another project so I put them on the back with a white border so that he would have places for his friends to write scripture on.  Carlos is a USC grad and a huge Gamecock fan.

I took it over to a friend of mines long arm so I could get it quilted quickly, I kind of wish I had done it on my domestic, but hind sight is 20 -20.  Anyway it was done and I sent it off to their home in Dalton, Georgia a little more than a week ago.  I go the sweetest call from Diane and Carlos when they got the box.


Please keep Carlos in your prayers as he fights this cancer.  You can follow his progress on caring bridge.  Here is the link to his page.
Here is a picture of Carlos with his wife Diane and two of his 4 grands, Jude and Olivia.  Please join me in praying for Carlos, Diane and all their family as they fight this disease.

Keep sewing.

Terry

Sunday, March 25, 2018

Pinmoor

Hey all,

I decided to take the plunge.  I took on some commission T-shirt quilts.  Celeste's boss wanted 4 quilts done, so I am working on them.  I have had to sideline my own sewing, which makes me a little sad, but not too much because I am doing these quilts and I hope they will love them.

I was watching a Leah Day video on you tube the other day and she was using a gadget called Pinmoor to baste a quilt. This would be for those of us who still quilt on domestic sewing machines.  I was planning to order her book on machine quilting, so I went ahead and ordered 2 packages of Pinmoors.   Let me tell you, that is the best thing since sliced bread.  If you used to baste your quilts with safety pins this is definitely an upgrade.  It took me half as long to baste one of the T-shirt quilts and no sore fingers!!!  They were invented by a quilter named Loretta Ivison.  I think they would have lots of uses in crafting.  Here is a link to her website where you can order directly from her.  Leah Day carries them also in her store.  They are a better buy in Loretta's link.

You can see my basting with my new gadget here.  To baste it, I put a slight bend in the pin, so that when it poked out of the quilt, I could push is Pinmoor on the pin.

I knew that when pulling them out, I would not want to put them back in the ziplock bag they came in.  So I ran down to Freds (we no longer have a Wal-mart) and got the two smallest storage boxes they had.  My plan is to throw the bent pins in one and the Pinmoor in the other.


I will be working on quilting this T-shirt quilt this week, but I have two tennis matches, so I will not be able to get a whole lot done.  Pray for me, I am playing singles in one of them.  For now the masters program is on hold...hope I can work that out!


Sew on,

Terry

Wednesday, March 7, 2018

Quilt updates

Dear Readers,

I decided to take a few minutes and give you an update on a gifted quilt....  

I gave this quilt to two one of my best friend's son and his wife for their first born son.  He is a doll....and I love the photos that they have posted.


This is his 7 mo photo...cuter every time!!


This weekend was the MQA's fall gathering.  I did not take too many photos, but I sure do enjoy this group of ladies.  It is nice to get together with other ladies that bring their experiences to see what they are working on.  From fibers to ironing surfaces to interleave quilts there was a lot to learn.  Looking forward to seeing everyone again in June!

Our new board


Take care,

Terry


Saturday, February 17, 2018

Quilted Valentines Cards

Hey Readers,

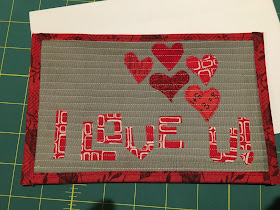
I did not get to do to much in the quilting room this week.  I did create a couple of quilted post cards.

I had intended to make about 4 or 5, but only got 2 done.  My dog, Bogie cut his foot playing in the yard and needed a fair amount of attention.  I had seen this tutorial on postcard by Rob Appell, but I had made them before, so I just watched it to see if he did anything different.  He does!  I have not been putting in the temtex so I tried that this time and it went well.  Rob uses fabric on both sides tho, and I like using watercolor paper for the card side, so I am not sure it was necessary, but I used it anyway.  If you click on the small things tab, you will see my postcards and art trading cards and some very small quilted things.

So, anyway I made one for Celeste, my daughter, and one for Will, my son.


On the Celeste's I just quilted the hearts and letters down.  Decided to leave it like that for a clean minimalist look.  


On Will's I went around each heart, then did straight line quilting across the card.  I did not go around each letter but felt the straight line stitching would be enough...it is just a post card and won't be subject to washing, etc.

The layers are a piece of cotton, a piece of batting, a stiff piece of stabilizer, like peltex, or temtex.  I also used some heat and bond to put the hearts and letters on.  I also used it to put the layers together.  Then I quilt around each letter and heart.   Once it is quilted I put the quilted layers together with the water color paper and sew through the card and all to put the binding on.  The binding also has heat and bond on the back of it as it will keep it from raveling and I don't fold it under.  It is just single  layered.  So I iron it on first then sew around the edge with a specialty stitch on the machine.


These are fun to make. So make some postcards and make someone's day!

Sew long,

Terry

Saturday, February 10, 2018

Log Jam

Dear Readers,

Had my second finish of the year.  Whoop, Whoop...remember when I could only get one or two quilts done in a year?  I finally got my Modern Logs quilt designed by Christa Watkins done!  You can click here to go to her blog, there is a tab at the top for the store.  I really like how she lists how many block you need for each size on the back... I made the throw size, that is 60 x 66 inches.

We have had a lot of bad weather here in Mississippi this winter, and have missed school, three days!!  That gave me lots of time to sew as I was not getting out on icy roads.

Front

I was going so slow, cutting one strip and sewing it around a square, then cutting one strip and sewing it around, and it was going so slow, so I cut a bunch of strips out of the fabrics that I had pulled.  So I cut a bunch of strips and put them next to my machine, then I could grab one and go.  It went much faster.  When I was done, I saw I had a big pile of funky angle cut strips, so I decided to sew them together in groups that were about the same length.  I would square them up every so often till I had all the strips sewn together.  Then laid them out on my guest bed and figured out how they should go together.  Had to fill in a few spots, but it went really well.

Back
 I am loving how it brightens up my living room.

I am working hard to put balance in my life.   School and sewing seem to be the only things I have made time for.  Tennis season is about to ramp up, but, I desperately need to add physical activity to my to do list.  So I may not get as much sewing done, and I have applied to be in a masters program.  I think I may be a glutton for punishment...but I am determined to make this work!

Sew on,

Terry

Monday, January 15, 2018

Eye Spy in Red

Dear Readers,

My first finish of 2018 was this eye spy in red.  I use Pat Yamin's Come Quilt with me Templates for her larger eye spy blocks.  Here is a link to her page.   I made it for my neighbor John Henry who walks with me.  I had hoped to finish it by Christmas, but with working so close to Christmas Day I couldn't get it done.  So once I had finished it, I took it over to their house and the kiddos were not home!  They were off to the movies with their grandmother.  So I left the two quilts with the parents.  When they got home they came over to thank me.  They were so appreciative and sweet. John Henry was so pleased, he had already picked his favorite blocks.  It was touching to watch how he folded it ever so carefully.  This quilt came out to be 61 x 47 so a nice sized throw for a little boy and he can use it for a throw for quite some time before he out grows it.  I mostly chose camping, sports and animal prints for John Henry.  I forgot to photograph the back, but it is a navy blue fabric.


On to the next UFO!!


Sew long, it is back to work tomorrow if the weather doesn't keep us out of school.

Terry

Stars over Winona

Dear Readers,

Another quilt I finished last fall was my Cookie Cutter Stars quilt that Barbara Cline designed for the Mississippi Quilting Association.  I had decided that I was going to make it using material that I had on hand.  In addition, I have wanted a quilted wall hanging for my classroom for a while, so of course I wanted it in school colors.  Red and white are the official colors but, we also use grey and black.  So I chose to do it in a variety of reds, black and white.


So each summer MQA hosts a nationally known teacher.  Last July it was Barbara Cline from Virginia.   She is the sister of one of my local guild members Julia Graber.  She has written a number of books, I have 3 of them I think.  You can go to her shop here.  Anyway she developed a new pattern that was only available to MQA members to teach.  She has it in her shop now.  It is called Cookie Cutter.

I learned several new techniques, which is wonderful!

Barbara has a way of inserting a fabric into a piece of fabric and she outlines that technique in her newest book.  Anyway, she taught us that technique and others too.  The two sided fabric twist at the corners was another technique that was new to me.

My tiger paws meander

I quilted this using a graffiti quilting technique I had been seeing quilting teachers like Angela Walters do on youtube.  I had also watched videos by Karlee Porter.  The other inspiration came from a book I have had for a while by Laura Lee Fritz.  I created my own design of for the top right corner and bottom left corner of tiger paws, since we are the Winona Tigers.  In the top left I quilted symbols for all the different subjects and activities I could think of.  In the bottom right I did words that I think of when I think of our school.  Around the edge I quilted words.  I did echo quilting on the stars and stipple quilting on the red background areas.


This quilt is 38 x 38 and is hanging in my classroom.  I put fabric with numbers on the back as I teach high school math.  No one will ever see it since it is a wall hanging, but I know it is there.

Have fun with your quilting from start to finish.  Thank you Barbara!!

Sew on,

Terry